Everything, Free Sewing Patterns & Tutorials, Sewing Projects & Patterns
A Scrappy Holiday Light Garland/Necklace (Tutorial & Free Sewing Pattern)
In the endless journey that is using the massive amounts of scraps generated by our daily sewing classes here at the studio, we’re always trying to come up with little projects that are simple to make, quick to finish and fun for our students! Patrick was getting in the holiday spirit this past week and came up with this adorable Holiday Light Garland or Necklace that we could have kids make in class before we take a break for the Holidays.
So, I wanted to share the pattern and tutorial with you so you can whip one up yourself, too! Perfect for using up small scrap pieces or make a larger garland out of a Fat Eighth or Fat Quarter!
Scrappy Holiday Light Necklace/Garland PDF Pattern (free!)
Materials Needed:
- The free Holiday Light Garland Pattern, click the photo above!
- Colorful Fabric for the bulbs, at least 6 1/2” square:
- 4 light, necklace version: 8 pieces. (4 colors, 2 each)
- Small 8 light, 4 1/2′ Garland : 16 pieces (4 colors, 4 each)
- Large 16 light, 9′. Garland: 32 pieces(4 colors, 8 each) OR 4 Fat Quarters.
- Grey/Gold/Black/Neutral Fabric for the caps: 3” squares.
- 8 pieces for a necklace or 1 Fat Quarter
- 16 pieces for small garland
- 32 pieces for large garland.
- Ribbon or twill tape- 1/4” – 1/2” wide
- Necklace: 24”
- Small Garland: 4 1/2′
- Large Garland: 9′
- Thread to match. I stuck with gray because it matches everything.
- Iron
- Pins
- Scissors
- Safety Pin
Once you’ve downloaded your pattern you have to open it in a PDF viewing program like Adobe Acrobat you will print it at 100% or Actual Size in order to print it at the right scale. Check the cap measures 3” square and you’re good to go!
If you don’t have usable scraps at home: we also have a kit available! includes one fat quarter each of Kona solids in red, blue green and yellow, gray and 3 yards of natural colored 1/2” twill tape.
What to Cut:
Whatever version you’re making, use the rule of 2 bulb and cap pieces for each light. If using a Fat Quarter, like in our kit, you can get 8 pieces out easily. You may also use a rotary cutter to cut the 3” squares for the caps.
There will be a right and wrong side of this project, so if you need to use less pretty stuff for the backside, I won’t judge you.
Constructing the Lights:
Begin by placing a cap piece right sides together with a bulb piece along the top straight edge as shown. Pin, then sew with a 1/4’’ seam allowance. Press seam open.
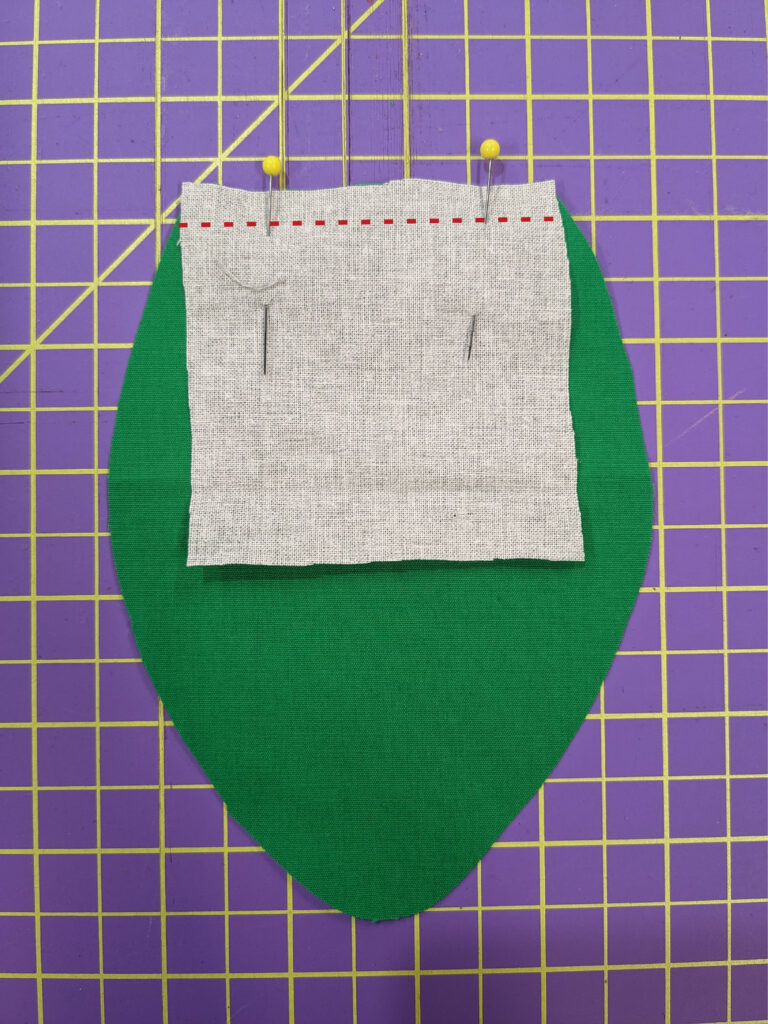
Repeat with the other pair of bulb and cap pieces that will make this light.
Place one sewn cap and bulb piece right sides together with another. Pin to sew around but leave the top straight edge unpinned. Sew with a ?’’ seam allowance with a slight pivot at the seam joining the cap to the bulb and gently navigating the bottom pointy curve. The shape you sew here is what your light will look like, so go slowly!
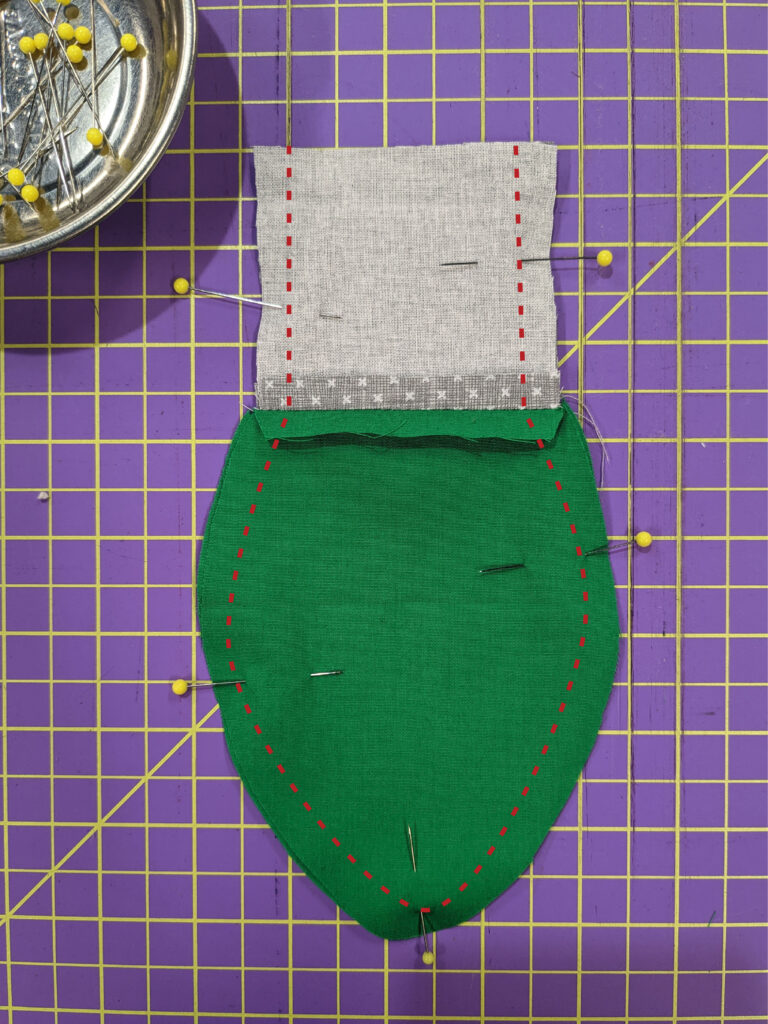
Trim your seam allowances in half to reduce bulk and help the bulb look more rounded when you turn it out. Clip into your pivot point. Turn it right side out and press flat.
Topstitch around the edges you just sewed, 1/8’’-¼’’ from the edge.
At the iron, fold the unsewn edge of the cap down to the back ¼’’ and press.
Fold again until the first folded edge meets the seam joining the cap to the bulb. Press well. Pin.
Edgestitch along the fold, creating a small tunnel.
Repeat with all the other lights.
String ’em up
Cut a length of ribbon or twill tape according to how many lights you made. We recommend:
- Necklace: 24’’ (lights sit next to one another)
- Small garland: 4 1/2’ (lights hang 3’’ a part)
- Large garland 9’(lights hang 3’’ a part)
Fasten the end of a safety pin (that is small enough to fit through the tunnels we made) to your ribbon and feed it through each light in whatever order you would like.

Optional: You may put a small stitch through the cap and ribbon to hold each light in place.
Also optional: You can create a small loop at the end of the ribbon by folding it back and stitching it in place (or, tie a knot with a loop) to make it easy to hang!
And you’re done! Quick, easy and very festive! If you use our pattern and like to share to social media, make sure to tag me at @julia_oldspoolnj on Instagram!